So this weekends efforts have largely revolved around me expanding my housing situation and creating a more impressive village than the previous efforts of two resin houses and whatever I've been able to cobble together from cardboard and masking tape.
Like I've mentioned above, my housing terrain is currently a couple of resin buildings in 15mm scale and to flesh that out I've built a house out of cardboard, and used mount board as a foot print to mark out other buildings. Now whilst they have been a pretty expedient solution for starting to game, they don't really look very pretty, they also don't offer multiple floors for your troops to utilise, not to mention it's quite hard remembering in the heat of battle that you can't "see" through a house when there isn't a physical presence to remind you.
So with that in mind I headed for the internet with the intention of adding to the stock of resin buildings that I own. In the process of looking at various resin models from a few manufacturers I also came across 4Ground pre painted MDF. Now I'm sure to many of you this won't be anything new, judging by the fact that there are many reviews of the product out there already, but they are new to me.......and I was quite intrigued
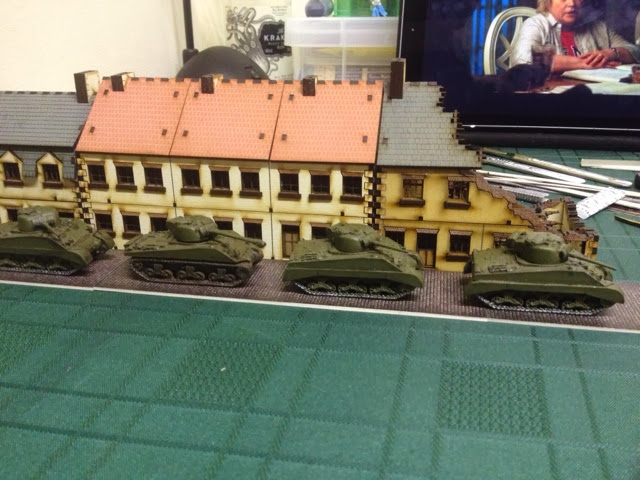
From what I can see these are priced pretty well, comparing well against pre painted resin, and not a terrible amount more than unpainted, the other big plus (for me personally) is that they look really crisp, as opposed to some resins which (in my opinion) look a little "fuzzy" in the details. But the big plus for me, is that the 4ground buildings allow ready access to all levels of the building for placement of troops. With the resins that I have, you have to pick the whole thing up if you want to place troops into the ground floor, which can be a bit of pain, to say the least.

So I ordered a few buildings that took my fancy from the 4ground website, namely:
Stone Hotel, Terrace 2, Semi 1 and Damaged Semi 3
They arrived from 4ground a few days later, well packaged in a plain, each building was in its own bag with instructions, which are a nicely printed A4 sheet with step by step picture instructions, and quite nicely included on the instruction sheet is a selection of 15mm signage, posters and propaganda.
The buildings themselves press out of the MDF easily and with a small bit of fine grit wet & dry paper to remove the small burrs, the pieces fit together really smoothly. PVA glue to stick them together, the instructions recommend a couple of elastic bands to hold the building together while the glue dries and quite frankly that would probably be enough, given how well the buildings fit together, but I used some mini clamps just to make double sure.
All in all when they are finished, the buildings look really nice, fit well only in themselves, but also fit really well next to each other and I think that with a dozen or so of these, they will makes really nice little village set up.

To tie a village together you of course need a road, and again, I've heard good things about quite a few different roads you can buy, different ways to make your own etc etc, but in my trawling through the internet I came across this absolute gem from Toshach miniatures, which is just a set of road sections in a PDF that you can print (preferably onto light card) and has dirt road, cobble road and Tarmac/asphalt road, straights, corners, junctions and transitions between the various types. The textures are really nice and even a halfway decent printer should be able to do them justice. I cut these from the printed sheets using a straight edge and a rotary cutter, then stuck them to mount card using Pritt stick before finally trimming the card and have ended up with the beginnings of a very cheap very nice looking road system. And by cheap I mean like $5 (about £3.50) for the PDF and then the A3 sheets of mount card I purchased from The Range for 80p each. I may move onto a more textured road system later, but for now these will do just fine, and even if I do upgrade later, I won't have spent that much, the kind of money you can incidentally spend on a couple of coffees without thinking.
As a finishing touch to the road, I'm going paint the edges of the roads in a matching grey to remove the starkness of the cut edges of the mount card. With the dirt tracks I will probably leave a little border that I can then cover with static grass or similar, give it even more character
No comments:
Post a Comment